Air Dry Clay: 10 Great Tips to Know Before You Start a Project
Air Dry Clay is a popular thing these days. It is a relatively easy-to-use and inexpensive medium to use. The creativity opportunities are endless!
So, like every post idea, I run across some great pins on Pinterest and get my creative mind turning. Then, off to Amazon to order some what I need (after some research) and plot.
Well needless to say this one… didn’t go as planned! I was left with a sticky, cracking, crumbling mess! And a lot of wasted time and wasted money. UGH! I had done everything other bloggers recommended. They made it look so easy. But what went wrong?
So, I decided I needed to change gears a little. Instead of making my usual creative post, I wanted to share something different.
{Note: this post contains affiliate links. This means that I will make a small commission – at no additional cost to you – if you make a purchase using my links.}
Thanks you for supporting my blog!
Today, I share with you 10 Tips on Working with Air Dry Clay. Hopefully, I can save you some frustration, time and money.
1. Prep Your Work Surface
While working on a project, don’t be surprised if you find something stuck to your clay. Clay is a dog hair, lint, dust bunny magnet! Help yourself and start with a clean surface.
I also recommend using a silicon craft mat, wax paper, or even a tea towel. This will let you transfer your project easily and without having it stick to your surface. Which leads to my next tip…
2. How to handle the STICKY
Air dry clay is very sticky. It will stick to your hands, the work surface, and your tools. Not all air dry clay is created equal. The easiest to work with I’ve found is Crayola Air Dry Clay. Another alternative is Model Air Dry Clay which is slightly more expensive.
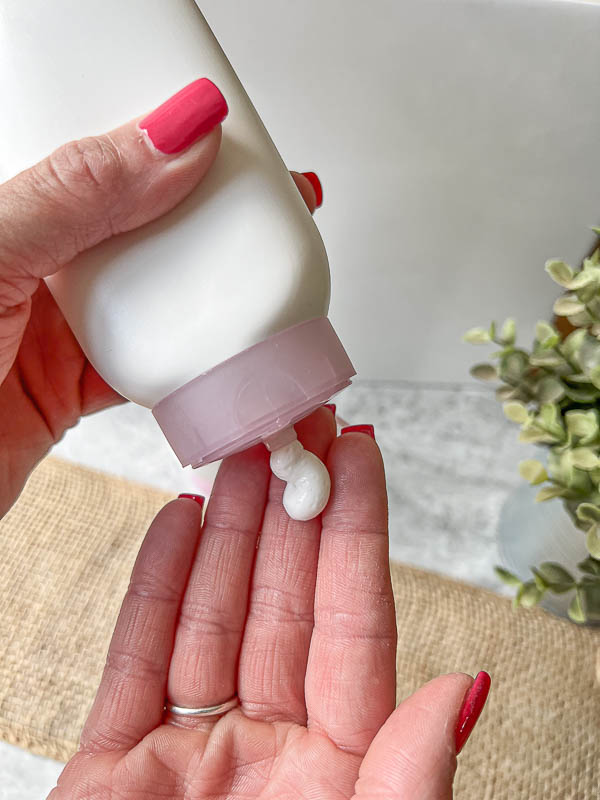
Also, I learned that a little hand lotion helps the situation. A little lotion on your hands before starting helps minimize the stick.
3. Cover Your Project
Place a damp paper towel over your project and then apply a layer of cling wrap. This keeps your clay from drying out and ready for you to resume when you can.
If your project is taking longer than you’d like or something comes up mid creation, you can cover and come back to it when you’re ready.
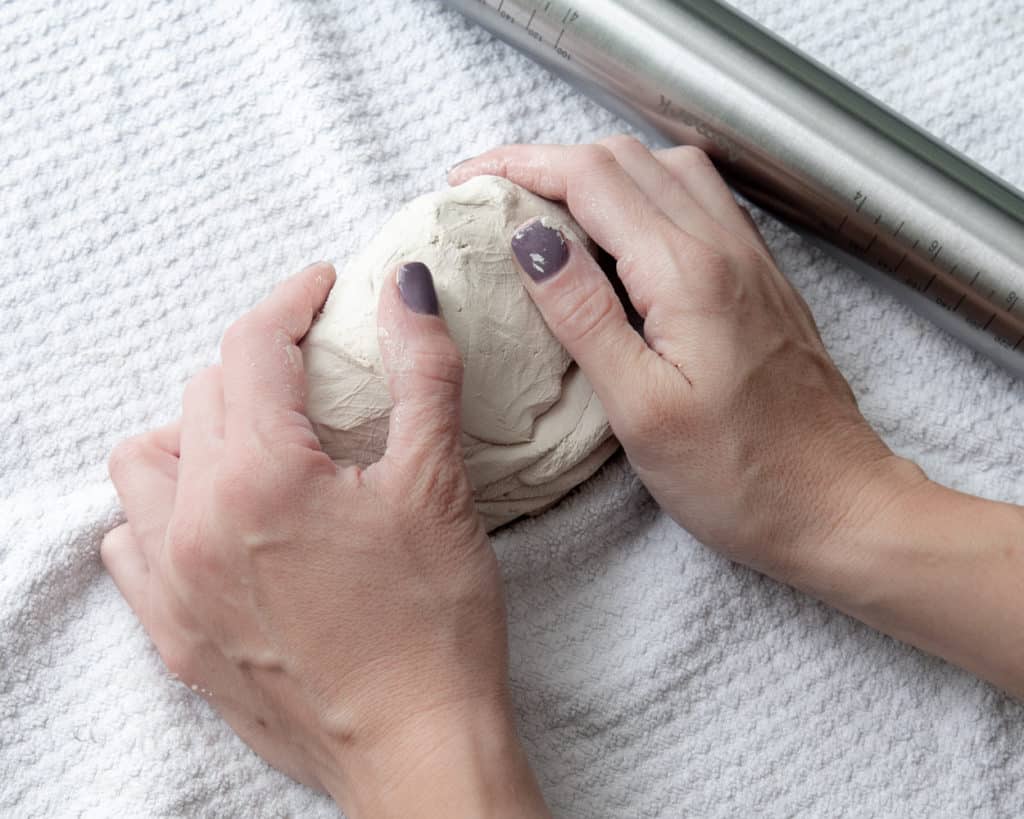
4. Don't Make Your Project Too Thin
If your clay that is too thin, it is more likely to crack. Keeping this in mind, make sure you start your project with a solid foundation. I typically use 1/4″ on my adjustable stainless steel rolling pinto ensure an even thickness.
5. Giving Your Project a Smooth Finish
When sculpting your air dry clay, it’s not uncommon to have imperfections. Smoothing out these imperfections are easy with a little water. Using a small sponge or a little water on your fingers you can easily smooth out these areas. Careful not to use too much water on your project, it will increase your drying time.
Also, don’t worry if you notice some rough areas after your project has dried. You can always use a little fine grit sandpaper.
6. Adding and Joining Clay
I alway sculpt by adding and taking away clay. When adding, make sure you “score” and “slip.”
Scrape both surfaces of the clay with a toothpick or a clay sculpting tool. This gives the new piece of clay something to adhere to. Using a little “slip” (watered down clay in a paste consistency) cover both scored surfaces. Then join them together using your finger or another sculpting tool. This ensures a strong bond which is less likely to crack or break.
7. Sculpting Small Items
When sculpting smaller more detailed items, you can strengthen them by using a 1:1 ratio of PVC glue and water as a wash. A simple Elmer’s Glue and water wash will help reduce the risk of breaking or cracking.
8. Drying You Clay
It’s best to allow all surfaces of your project to have air exposure if possible. If using a mold, allow your clay to dry enough to maintain shape and then remove it from the mold. This will help speed up the drying process.
I also recommend flipping your projects if possible. This too will help speed up the process. Most projects take 24 hours to dry, but are fully cured at 72 hours.
9. Coloring Air Dry Clay
Before: If you wanted to make your own colored air dry clay, it’s super easy. Using food coloring, high quality acrylic paint or watercolor you can create your own colored clay. Simply add a few drops [a little goes a long way] and kneed in until you have a consistent color throughout.
After: If you wanted to paint your piece after it is dry, you can. Using high quality acrylic paint, you can paint a dry project as desired. Make sure you are allowing drying times between layers of paint.
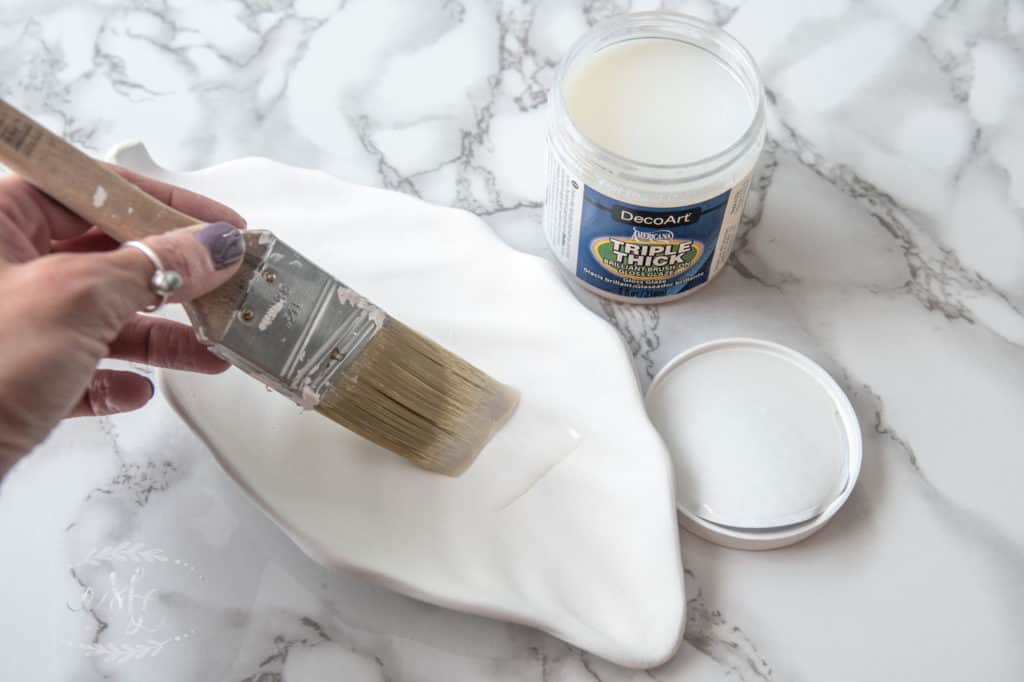
10. Sealing Your Project
Now, there’s some controversy here. After much research, it seems that the verdict is that you cannot truly “waterproof” air dry clay. However, you can make it water resistant. Air dry clay ca be sealed with an acrylic varnish or an air dry glaze. Personally, I like to use DecoArt Triple Thick Glaze because it gives such a beautiful glossy finish. You can also used ModPodge Acrylic Sealer for items that simply need be protected from fading or chipping.
Well there you have it, 10 tips to know before working with air dry clay. Air dry clay is really a great medium to work with and I plan on using it more in the future, now that I know how to work with it correctly!
I hope these tips save you some time and headaches. If you think I have missed anything, please feel free to share below in the comments. I’d love to hear your personal experiences as well as your own tips and tricks!
37 thoughts on “Air Dry Clay: 10 Great Tips to Know Before You Start a Project”
Emma Frampton
I’m also disabled and planning on selling my first creations very soon! (nail bitting commenced)
What’s the likely hood of it falling apart after people paying money for it lol.🤦♂️
Sorry that’s not my question more a fear lol.
So rightly or wrongly I purchased some gnome figure molds I’ve stuffed them full but how long should I leave them and what’s the easiest way to get them out? They’ve been well cornfloured but I’ve not cast anything this shape before?
My air dry clay is very earthy but drys grey, no clue of the name sorry guys.
I want to thank all of you for the advice. I’m so happy I found your post and this medium, you can be so creative even in bed on those days.
Unfortunately, I haven’t casted anything using air dry clay so I’m unsure how it will handle with molds. Often you want to pour into molds something that will not shrink as it dries (i.e. – resin, plaster of paris, etc…) so I’m not sure how this medium will behave.
I’m so happy to help you problem solve anything I can though. I would make sure you heat up your molds to help get them off your clay. Know it’ll take a long time to dry as it’ll be a solid piece! Paint them and seal them. I’m working on a post about sealing your projects, but there are a few great items on the market. Look for acrylic sealers!
I’m so glad you’ve found a way to create, even on those bad days! It takes a lot of strength and courage to carry on despite all the challenges life gives us. Please never stop creating beautiful things for yourself to enjoy and others as well!
Maria do you think ceramic plebeo paint will work when painted on an air dried item. I want to bake on low 140 deg. For 30 minutes…what are your thoughts?
I haven’t ever used that paint, however I would bake your items first regardless the paint you intend to use. Then, once they’re dry and cool… paint away! Make sure you seal your projects accordingly! It’s always good to preserve your keepsakes!
I believe there is a sealer out there that is matte. You could try modge podge matte sealer and see if that gives you the desired effect. Great question! Thanks for reading along!
I’m brand new at this air dry thing so my questions are pretty elementary. What about kneading before you roll and cut? How crucial is this? Am I trying to soften the clay or warm it up? Next, when I have my piece cut out, should I put wet paper towel over them during drying? My starter samples seem to be curling slightly in drying. Is that because they are rolled too thin or drying too quickly? Should I weight them a bit?
Thanks for your information and guidance. Any and all suggestions are welcome. I think this is going to be a fun change from painting and cross stitching. Thanks a bunch.
I apologize for my delay! I doo weight mine down. I also flip them if possible to help minimize curling. You can also dampen them and uncurl them instead of scrapping the project all together. I hope I’m of some help… as tardy as I am.
Hey Maria! I REALLY appreciate that you took the time to write this post AND do it so WELL! I’m also very pleased to see that you have taken the time to reply to each and every comment. How wonderful of you. Too often I just do not see that happen. It is refreshing and encouraging!
I tried using air dry clays a while ago and gave up pretty well right away for all the issues YOU ran into but am wanting to try again and have been SO LUCKY to have happened upon your post FIRST! YAY!!! I feel SURE of success now and I can’t thank you enough.
I’ve been an artist for nearly 30 yrs but am now on the “permanently disabled list” and cannot feel my dominant hand – just for starters – so I am needing to adapt and change the way I work and what I work with. disabilities don’t end lives, they just change them, right? So I am going back to my first love: paper mache. The pulp kind, also air dry clay, and Celluclay, and any substance like these things is just what I need! Even plaster is on the roster! There are all kinds of new plasters that are strong but lighter than the original, but I will start with air dry clay. With YOUR knowledge at hand I feel confident now that it will be an enjoyable experience. Thank you!
Thank you for sharing your touching story. Your line of “disabilities don’t end lives” really resonates. I’m SO proud you didn’t give up and continue to strive to find something that satisfies your creativity side while honoring your journey. I’m so glad you found this post useful and inspiring.
I’m so very thankful you left this message. Some days I wonder if what I’m doing on this platform is actually helping readers. This fills my cup and it runneth over.
Sending you lots of love and joy with your new media. I’d love you to share some of your projects you’re proud of. <3 Stay in touch.
There are a few different types of air dry clay, some are easier to use than others! I would kneed it a lot to soften it before rolling. Use a hard surface and a rolling pin. I’ve also tried a little lotion on your rolling pin to “lubricate it.” I’ve also used MDF to help roll onto and let it dry on it for a flat smooth surface. I haven’t worked with Das Air Clay but I’ve had some other clay that has been challenging. It takes a little working with to get it right.
I hope that helped a little! Happy creating and thank you for reading!!
I too have problems with dominate hand. Started using air dry clay just recently, from my daughter she’s very crafty. My sister and I are both retired, and started making a gnome village in her flower bed… my clay is the gray sticky one, my sisters is white and EASIER to work with and drys quicker, but it’s fun, thank you for all your advise, I will keep following… thanks cathy
I’ve seen acrylic wall puddy being used on projects. Can you add enough water to the clay I have, to use like the puddy being applied?
With a paint brush?
I’ve just started my first project. Using the clay around crystals to make pendants.
Unfortunately my country is in lockdown so I can’t go buy glaze or hodge podge clue.
Can the sealing agents wait or must they be applied immediately?
Many thanks Maria!
Appreciate your time and energy 🙂
I’m so excited you completed your first project! Do not worry at all, there isn’t a time constraint on glazing. I would just keep the clay away from any water or steam (like don’t keep in a bathroom or in the kitchen.) Even after it’s dried, if you apply water to your project it will affect the surface of the clay.
But please do not fret! The clay will absorb the glaze when you’re ready.
Stay safe friend. Keep creating and thank you for reading along. <3
Maria, I really appreciate you sharing tips on how to minimize cracking when using air dry clay This is the only drawback I’ve had with using this medium. Like you, I love it. I also like working with small river rocks as well! Thanks for sharing!
Miss Mary 😀
You are so sweet! Thank you so much for your kind words! It can really be a challenge to minimize cracking, but I’m glad it doesn’t deter you from working with such a great medium.
Thank YOU for reading and your words of encouragement. Happy creating! 😀
I actually don’t have a great answer to that. I would say if you’re looking to glue things back on, for with E3000 all purpose glue. It’s reacts with moisture and is flexible so it will not peel and crack off the finished surface.
I’m a life long self taught artist on canvas and paper with age and hand surgery’s I was told to use clay as therapy. I like the crayola and polymer, ( polymer is expensive to me) I’m making wire,glue,fingernail polish bonzie trees with the clay for the main part of tree but my problem is with cracking? Any suggestions please I’m so frustrated thanks
My experience is to not add too much water to the clay when you’re working on it. I do have a spray bottle that I will occasionally dampen my project and cover it with cling wrap if I’m spending a few days on it. If your joints are cracking, then I would recommend you using slip and being very thorough with your joining techniques. I’m asking where are your cracks mostly? I’d like to help you more.
Thank you so much for your generosity in sharing your experience & knowledge. I have been given a quite a few packets of air dry clay which I’ve never used before, your tips will give me a lot more confidence to open one up and start using it.
Thank you for your sweet and kind words. I hope you enjoy creating with your air dry clay! It’s one of my favorite mediums and so quick and easy to use. Sending you lots of creative vibes. Thanks for reading along.
Thanks for the tips, I’m just starting out playing with this clay and have often had my work stuck to a board and ruined so that’s a great help thank you
So I have to confess, that was the main reason I wrote this post! I bought all the things, had a great project in mind, started rolling out my first slab and poof. Stuck. I was so frustrated. The research began, and I spent hours hunting around for information on air dry clay. I knew if I was struggling, so were my friends out there! I’m so glad this post helped you in your creative adventures.
Happy crafting and thank you so much for your kind words.
This was so helpful! Do you have any advice for me with painting and such after I’ve made my work? I’ve used acrylic paints and air dry varnishes but each time after a little while like even a week after it’s dried I have the varnish or paint peel off with a powdery layer underneath like it won’t stick because my clay project is too powdery.
Hope you can help 🙂
– Ally
Oh no! Well historically I’ve used paint in the dough mixture (if I’m using my own recipe) or just spray painted it and then sealed it with this glaze and it’s held up just fine. Check out my post on making your own paint palette. I walk you through the steps of painting and sealing this project.
I hope I’ve helped answer your question. If you still run into an issue let me know. We can problem solve this together!
I’m making a Mourning Jug: I’ll be covering a glazed heavy ceramic jug with mementos like jewelry, small toys, beads and medals. Will air dry clay stick to the jug enough to hold all these things?
For something like that I would look into using e3200 epoxy adhesive. It expands and contracts without cracking. Air dry clay tends to flake and crack if more sealed and even when sealed it doesn’t boast well under a resistance. You could clay over the epoxy to give it a better look. That would certainly work!
Thanks for visiting my little piece of the internet!
I’m Maria, a lover of furry things, coffee and anything creative. This blog is where I love to share affordable home decor ideas, great DIYs, yummy recipes, unique crafts and so much more.


37 thoughts on “Air Dry Clay: 10 Great Tips to Know Before You Start a Project”
I’m also disabled and planning on selling my first creations very soon! (nail bitting commenced)
What’s the likely hood of it falling apart after people paying money for it lol.🤦♂️
Sorry that’s not my question more a fear lol.
So rightly or wrongly I purchased some gnome figure molds I’ve stuffed them full but how long should I leave them and what’s the easiest way to get them out? They’ve been well cornfloured but I’ve not cast anything this shape before?
My air dry clay is very earthy but drys grey, no clue of the name sorry guys.
I want to thank all of you for the advice. I’m so happy I found your post and this medium, you can be so creative even in bed on those days.
Happy creating everyone! xoxo
Emma,
Unfortunately, I haven’t casted anything using air dry clay so I’m unsure how it will handle with molds. Often you want to pour into molds something that will not shrink as it dries (i.e. – resin, plaster of paris, etc…) so I’m not sure how this medium will behave.
I’m so happy to help you problem solve anything I can though. I would make sure you heat up your molds to help get them off your clay. Know it’ll take a long time to dry as it’ll be a solid piece! Paint them and seal them. I’m working on a post about sealing your projects, but there are a few great items on the market. Look for acrylic sealers!
I’m so glad you’ve found a way to create, even on those bad days! It takes a lot of strength and courage to carry on despite all the challenges life gives us. Please never stop creating beautiful things for yourself to enjoy and others as well!
Keep in touch and let me know how it turns out.
Biggest of hugs,
Maria
Maria do you think ceramic plebeo paint will work when painted on an air dried item. I want to bake on low 140 deg. For 30 minutes…what are your thoughts?
Dolores,
I haven’t ever used that paint, however I would bake your items first regardless the paint you intend to use. Then, once they’re dry and cool… paint away! Make sure you seal your projects accordingly! It’s always good to preserve your keepsakes!
Cheers,
Maria
Hi! Thanks for very helpful text! Great tips. May I ask is it possible to paint so that color will be matte, not glossy?
Anna,
I believe there is a sealer out there that is matte. You could try modge podge matte sealer and see if that gives you the desired effect. Great question! Thanks for reading along!
Cheers,
Maria
I’m brand new at this air dry thing so my questions are pretty elementary. What about kneading before you roll and cut? How crucial is this? Am I trying to soften the clay or warm it up? Next, when I have my piece cut out, should I put wet paper towel over them during drying? My starter samples seem to be curling slightly in drying. Is that because they are rolled too thin or drying too quickly? Should I weight them a bit?
Thanks for your information and guidance. Any and all suggestions are welcome. I think this is going to be a fun change from painting and cross stitching. Thanks a bunch.
Marg,
I apologize for my delay! I doo weight mine down. I also flip them if possible to help minimize curling. You can also dampen them and uncurl them instead of scrapping the project all together. I hope I’m of some help… as tardy as I am.
Cheers,
Maria
Hey Maria! I REALLY appreciate that you took the time to write this post AND do it so WELL! I’m also very pleased to see that you have taken the time to reply to each and every comment. How wonderful of you. Too often I just do not see that happen. It is refreshing and encouraging!
I tried using air dry clays a while ago and gave up pretty well right away for all the issues YOU ran into but am wanting to try again and have been SO LUCKY to have happened upon your post FIRST! YAY!!! I feel SURE of success now and I can’t thank you enough.
I’ve been an artist for nearly 30 yrs but am now on the “permanently disabled list” and cannot feel my dominant hand – just for starters – so I am needing to adapt and change the way I work and what I work with. disabilities don’t end lives, they just change them, right? So I am going back to my first love: paper mache. The pulp kind, also air dry clay, and Celluclay, and any substance like these things is just what I need! Even plaster is on the roster! There are all kinds of new plasters that are strong but lighter than the original, but I will start with air dry clay. With YOUR knowledge at hand I feel confident now that it will be an enjoyable experience. Thank you!
Steph,
Thank you for sharing your touching story. Your line of “disabilities don’t end lives” really resonates. I’m SO proud you didn’t give up and continue to strive to find something that satisfies your creativity side while honoring your journey. I’m so glad you found this post useful and inspiring.
I’m so very thankful you left this message. Some days I wonder if what I’m doing on this platform is actually helping readers. This fills my cup and it runneth over.
Sending you lots of love and joy with your new media. I’d love you to share some of your projects you’re proud of. <3 Stay in touch.
XOXO,
Maria
Great article. Thank you so much.
I have das air dry clay and when I roll it out I can’t get it smooth. You have a tip !?? Thanks so much Lorie
Lorie,
There are a few different types of air dry clay, some are easier to use than others! I would kneed it a lot to soften it before rolling. Use a hard surface and a rolling pin. I’ve also tried a little lotion on your rolling pin to “lubricate it.” I’ve also used MDF to help roll onto and let it dry on it for a flat smooth surface. I haven’t worked with Das Air Clay but I’ve had some other clay that has been challenging. It takes a little working with to get it right.
I hope that helped a little! Happy creating and thank you for reading!!
Maria
I too have problems with dominate hand. Started using air dry clay just recently, from my daughter she’s very crafty. My sister and I are both retired, and started making a gnome village in her flower bed… my clay is the gray sticky one, my sisters is white and EASIER to work with and drys quicker, but it’s fun, thank you for all your advise, I will keep following… thanks cathy
I’ve seen acrylic wall puddy being used on projects. Can you add enough water to the clay I have, to use like the puddy being applied?
With a paint brush?
Thank you for the great tips!
I’ve just started my first project. Using the clay around crystals to make pendants.
Unfortunately my country is in lockdown so I can’t go buy glaze or hodge podge clue.
Can the sealing agents wait or must they be applied immediately?
Many thanks Maria!
Appreciate your time and energy 🙂
Angela,
I’m so excited you completed your first project! Do not worry at all, there isn’t a time constraint on glazing. I would just keep the clay away from any water or steam (like don’t keep in a bathroom or in the kitchen.) Even after it’s dried, if you apply water to your project it will affect the surface of the clay.
But please do not fret! The clay will absorb the glaze when you’re ready.
Stay safe friend. Keep creating and thank you for reading along. <3
XOXO,
Maria
Thank you so much Maria!
You are so kind and helpful. Thank you for sharing with us Xx
🌷🌷🌷🌷🌷
Stay safe too friend.
Angela,
My pleasure! Thank you so much for your kind words and reading along. I’m glad you found some useful info!
XOXO,
Maria
Maria, I really appreciate you sharing tips on how to minimize cracking when using air dry clay This is the only drawback I’ve had with using this medium. Like you, I love it. I also like working with small river rocks as well! Thanks for sharing!
Miss Mary 😀
Miss Mary,
You are so sweet! Thank you so much for your kind words! It can really be a challenge to minimize cracking, but I’m glad it doesn’t deter you from working with such a great medium.
Thank YOU for reading and your words of encouragement. Happy creating! 😀
Hugs,
Maria
Can you hot glue pieces on that have fallen off?
Judy,
I actually don’t have a great answer to that. I would say if you’re looking to glue things back on, for with E3000 all purpose glue. It’s reacts with moisture and is flexible so it will not peel and crack off the finished surface.
Thanks for reading!
Cheers,
Maria
Hi Judy, Miss Mary here. I found that hot glue works best for me when reattaching pieces back into place. Other glues tend to peel off too easy.
I’m a life long self taught artist on canvas and paper with age and hand surgery’s I was told to use clay as therapy. I like the crayola and polymer, ( polymer is expensive to me) I’m making wire,glue,fingernail polish bonzie trees with the clay for the main part of tree but my problem is with cracking? Any suggestions please I’m so frustrated thanks
Carolyn,
My experience is to not add too much water to the clay when you’re working on it. I do have a spray bottle that I will occasionally dampen my project and cover it with cling wrap if I’m spending a few days on it. If your joints are cracking, then I would recommend you using slip and being very thorough with your joining techniques. I’m asking where are your cracks mostly? I’d like to help you more.
Cheers,
Maria
Hi Maria,
Thank you so much for your generosity in sharing your experience & knowledge. I have been given a quite a few packets of air dry clay which I’ve never used before, your tips will give me a lot more confidence to open one up and start using it.
Yvonne,
Thank you for your sweet and kind words. I hope you enjoy creating with your air dry clay! It’s one of my favorite mediums and so quick and easy to use. Sending you lots of creative vibes. Thanks for reading along.
Hugs,
Maria
Thanks for the tips, I’m just starting out playing with this clay and have often had my work stuck to a board and ruined so that’s a great help thank you
Julia,
So I have to confess, that was the main reason I wrote this post! I bought all the things, had a great project in mind, started rolling out my first slab and poof. Stuck. I was so frustrated. The research began, and I spent hours hunting around for information on air dry clay. I knew if I was struggling, so were my friends out there! I’m so glad this post helped you in your creative adventures.
Happy crafting and thank you so much for your kind words.
Cheers,
Maria
This was so helpful! Do you have any advice for me with painting and such after I’ve made my work? I’ve used acrylic paints and air dry varnishes but each time after a little while like even a week after it’s dried I have the varnish or paint peel off with a powdery layer underneath like it won’t stick because my clay project is too powdery.
Hope you can help 🙂
– Ally
Ally,
Oh no! Well historically I’ve used paint in the dough mixture (if I’m using my own recipe) or just spray painted it and then sealed it with this glaze and it’s held up just fine. Check out my post on making your own paint palette. I walk you through the steps of painting and sealing this project.
I hope I’ve helped answer your question. If you still run into an issue let me know. We can problem solve this together!
Cheers,
Maria
Thank you so much for your shared knowledge. Here’s hoping I can now make some nice little projects. 😁
Carol,
Thank you for your kind words. You have just made my day! I hope you enjoy your projects!
Hugs,
Maria
Thank You So Much For The Tips
Cynthia,
Of course! Thanks for reading!
<3
Maria
I’m making a Mourning Jug: I’ll be covering a glazed heavy ceramic jug with mementos like jewelry, small toys, beads and medals. Will air dry clay stick to the jug enough to hold all these things?
Mollie,
For something like that I would look into using e3200 epoxy adhesive. It expands and contracts without cracking. Air dry clay tends to flake and crack if more sealed and even when sealed it doesn’t boast well under a resistance. You could clay over the epoxy to give it a better look. That would certainly work!
Happy crafting!
Maria